
- LIFESTYLE
- FASHION
- FOOD
- ENTERTAINMENT
- EVENTS
- CULTURE
- VIDEOS
- WEB STORIES
- SPORTS
- GADGETS
- CAR & BIKE
- TRAVEL
- SOCIETY
- GALLERIES
- NORTH EAST
- INDULGE CONNECT

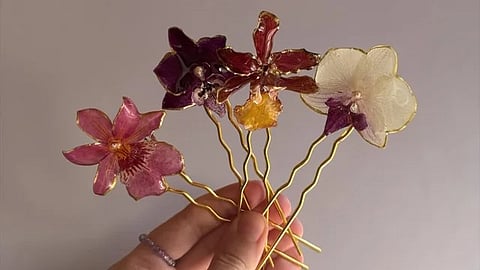
They are everywhere on the runway, cascading down editorial necklines and framing cheeks in luminous, botanical splendour: real orchid jewellery. Equal parts high-fashion statement and delicate ode to nature, these living gems have captured the imagination of stylists and artisans alike. But beneath their opulent appearance lies an astonishing secret — bringing this ethereal trend into your own jewellery collection doesn’t require a master atelier.
With a few hand-picked blooms, a touch of resin and a quiet afternoon, you can transform fragile petals into everlasting, wear-forever art. Fresh orchid jewellery can be part of your wardrobe and making your own takes less than 30 minutes.
Materials needed are Fresh orchid blooms (Dendrobium or Phalaenopsis work best due to their thick petals), flat-back earring posts or blank ring bases, jewellery wire (24 or 26 gauge) or a clear elastic cord, quick-drying clear resin, Mod Podge or clear gel nail polish (to preserve), E6000 glue or clear jewellery adhesive and a small paintbrush.
Trim the orchid stem right at the base of the flower. Using a small paintbrush, apply a thin, even coat of clear resin, Mod Podge or gel polish over the front and back of the petals. Let it dry completely. This locks in moisture, prevents wilting, and gives the bloom a sturdy, glossy finish.
For Earrings/Rings, apply a generous drop of E6000 or clear jewelry adhesive to the back center (the calyx) of the reinforced flower. Press the earring post or ring blank firmly against it and hold for 30 seconds. Allow to cure according to adhesive instructions.
For a Necklace/Bracelet, carefully thread a short piece of 24-gauge wire through the back base of the flower stem to form a small hidden loop. Pass a delicate chain or clear elastic cord through the loop. Finally, apply one last protective topcoat to any exposed wire or adhesive joins to ensure everything stays secure and water-resistant.
Remember to choose orchids with firm, fully opened petals that show no bruising or browning. Resin-sealed orchids can last for weeks, while lighter gel-coated pieces generally stay vibrant for several days. Store them in a cool, dark place away from direct sunlight when not in use.
For more updates, join/follow our WhatsApp, Telegram and YouTube channels.